|
1. Downloads
2. Introduction
3. Dynamics setup
4. Shading
1. Downloads
The complete scene file (Maya ASCII,
900KB)
View
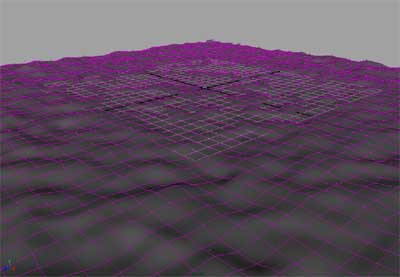
the movie of the completed water (Quicktime, 374KB)
View
a full-res rendered frame
2. Introduction
Probably the best way to make convincing sea water in Maya is to
use an animated displacement map on a watery-textured plane. While
I have found that this method produces highly realistic results,
the long render times required for displacement make it impractical
for many situations.
The method outlined here does not produce ultra-real water waves.
Instead, it is intended for use as a shortcut for use when low,
rolling waves are acceptable in a shot. Because it uses Maya's particle
system it makes tweaking and previewing wave motion fast and simple.
I have not yet produced realistic fluid dynamic effects such as
breaking wave tops or wakes with this method, but I'm sure it would
be possible.
3. Dynamics setup
Make a high density NURBS plane (I used 50 U patches and 50 V patches).
The higher the density the more choppy your final water will be.
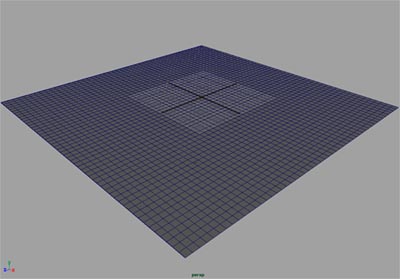
Name this plane "baseWater"
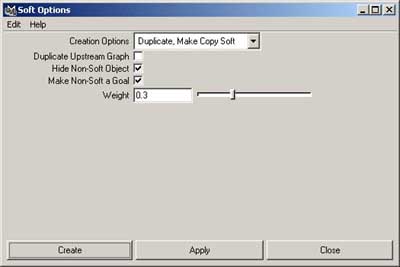
Make baseWater a soft body using Soft/Rigid Bodies > Create
Soft Body. Under creation options specify Duplicate, Make
Copy Soft. Check Hide Non-Soft Object and Make Non-Soft
a Goal. Set the (Goal) Weight to 0.3.
This will create a new NURBS plane, identical to baseWater, with
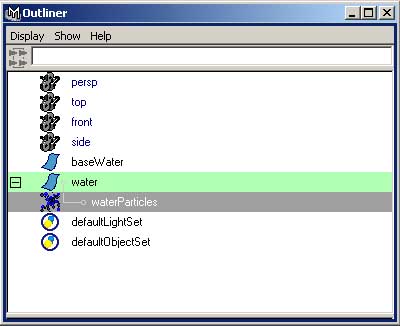
each of its CVs controlled by particles. Rename this new plane water.
Open the Outliner and expand the list under water. Here you
will see the newly created particles that control the mesh. Rename
them waterParticles
Now select waterParticles and go to Fields>Turbulence.
Create a new field with a magnitude of 40 and an Attenuation of
0.
Now play the simulation. The particles
should move from their rest position and begin udulating rapidly.
Play the animation until the surface of the water is reasonably
perturbed (nice wave heights and troughs). If ncessary, adjust both
the magnitude of the turbulence field and the Goal Weight of the
water particles to acheive the desired wave scale.
Play the animation ahead until the water assumes a desirable state.
Select the water particles and go to Solvers > Initial State
> Set for Selected.
While this setup produces a sort of random, roiling effect in the
water, the motion may be varied and fine tuned with the application
of additional fields or per-particle attributes (not outlined here).
For my water I added an additional turbulence field with slightly
smaller magnitude and higher frequency. This had the effect of further
varying and randomizing the wave motion.
4. Shading
Please note: The following shader network was designed to be rendered
without raytracing enabled. If you intend to raytrace
your water, you will need to change many of the variables to obtain
a desirable effect.
Downloads:
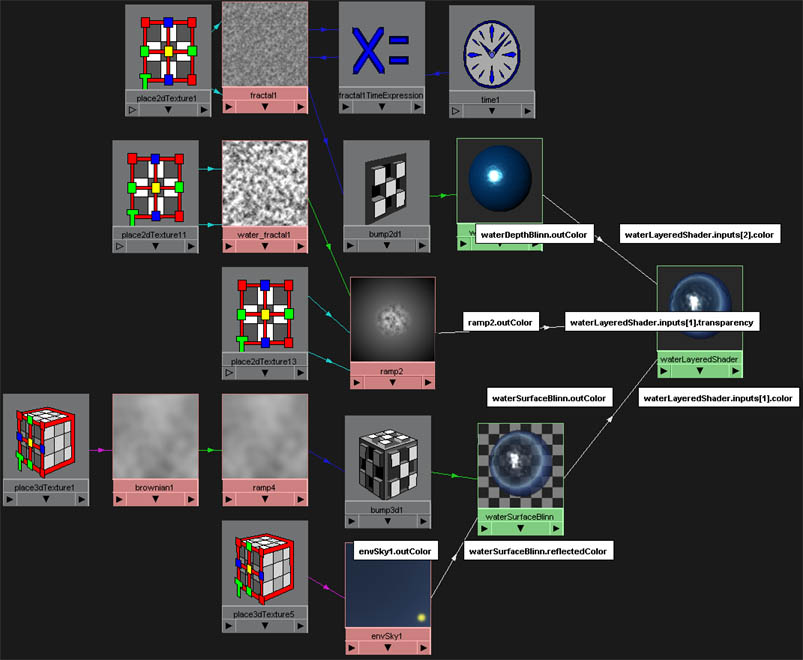
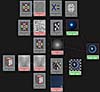
Here is the seawater shader:
water.ma (7KB)
Here is the hypershade view of the shader (click to view a larger
version):
For the seawater shader(Maya ASCII) I use a layered shader to combine
two separate Blinn textures. One deep blue, opaque Blinn to simulate
light penetrating into the ocean depths, and one semiTransparent
Blinn shader to create the effect of light reflecting off the ripples
on the surface.
First open the hypershade window. Create a deep blue Blinn with
high diffuse, 0.8; low Eccentricity, 0.1; and a high specular roloff,
8.0 (This is typical of shiny materials like metal and water that
have very high specularity). I've shifted the specular color a bit
in the blue direction, to give my water a kind of deep blue, cold,
icy quality. Name this waterDepthBlinn, as it will be the
lowest layer of the water shader.
Map a 2D fractal to the bump map node of waterDepthBlinn.
I set the amplitude rather low (about 0.4) and the frequency ratio
rather high (6.0) to extract a lot of detail out of the fractal
pattern. I also increase the minimum and maximum levels (the number
of recursions the computer goes through when generating the fractal)
to 4.0 and 15.0, respectively.
This will simulate the very tiny ripples that scatter the light
in the water. In real life these ripples are constantly in motion.
To acheive this I used an expression to control the time attribute
of the fractal.
In the attribute editor for the newly created fractal, check "Animated"
and right click within the data field for the time attribute and
select Create Expression. This will open the expression editor.
In the Expression area of the editor enter the following expression:
fractal1.time += 0.002;
This very simple expression tells the computer to increment (+=)
the time variable by 0.002 units each frame. This is a somewhat
nontraditional way to control the time variable (normally one would
simply connect the "out" time variable from the time1
node to fractal1.time) but I find it makes it easier to fine
tune the motion of the ripples by controlling the increment directly.
When you playback the animation in the window, the fractal swatch
should update in the hypershade window and you will see the pattern
changing slowly over time.
Next make the top layer of the water:
I've adapted the Antarctic
Water v1.0 shader from Highend3D
for use as the top coat. The best part about this shader is its
use of a circular shader to control both its transparency and its
color. This creates a nice natural color variation in the water
as distance from the camera increases. The shader also has its own,
much smoother, bump map made using a brownian texture. This will
nicely complement the higher frequency ripples created earlier.
The most important change I've made to the Antarctic shader is to
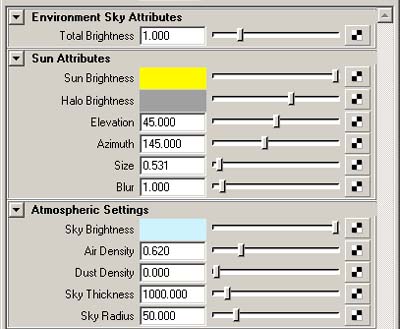
plug an environment sky node into the reflected color input of the
Blinn node. This will produce the varied blues and whitish reflections
on the surface that will really make our water look wet.
The envsky node will have such a great effect on the color of the
water surface Blinn that its actual color should beset to nearly
black. Any higher luminance values will make it bloom out and appear
a milky white.
Below is the attribute editor view of the new envsky1 node:
Once the envsky node is plugged into the reflected color of the
second Blinn, it's time to make a layered shader and combine the
two layers.
Create a layered shader (I've named it waterLayeredShader)
and place it next to the two Blinns in the work area of the hypershade.
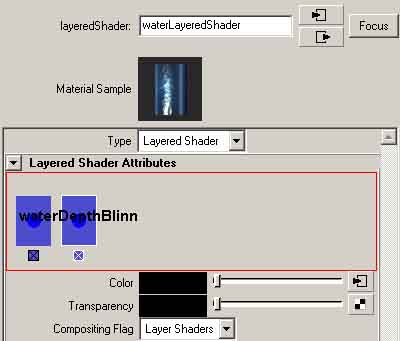
Create two layers by clicking in the large rectangle at the top
of the attribute editor for the layered shader. Now, with the top
layer highlighted (the one to the far left), drag the swatch from
waterSurfaceBlinn onto the "Color" entry. Maya
will make the connection.
Continue by connecting waterDepthBlinn.outColor to waterLayeredShader.inputs[2]color;
and ramp2.outColor to waterLayeredShader.inputs[1]transparency.
The transparency field for each layer in the layered shader is analogous
to a layer mask or opacity value in Adobe Photoshop. Before closing
the attribute editor make sure that the transparency for layer 2
(waterDepthBlinn) is set to zero and "Compositing Flag"
is set to "Layer Shaders".
One last thing that must be done to the layeredShader is a workaround
to make sure shadow passes render properly. Connect the "out
Matte Opacity R" channel on one of the Blinns to the in Matte
Opacity on the Layered Shader. Otherwise any shadow passes will
render the layered shader as a large all-black swatch.
That's it! Apply the new layered shader to the water plane and the
simulation is ready to render -- and render it will, much faster
than using displacement.
View
a rendered frame or watch
the movie (Quicktime, 374KB) of the completed water.
If you have any questions or comments on this tutorial please email
me.
|